


WebRTC (Web Real-Time Communication) is an open-source project that provides web browsers and mobile applications with real-time communication via simple application programming interfaces (APIs). With WebRTC, you can build applications that allow peers to exchange audio, video, and data in real time without requiring plugins or additional software.
In this article, we'll cover the various topics used in WebRTC, including signaling, STUN, TURN, and NAT, and explore how to use WebRTC in Node.js.
WebRTC can be implemented in the following phases -
Signaling
Connecting
Securing
Communicating
WebRTC protocol works on UDP (User Datagram Protocol) for real-time communication.
UDP
UDP (User Datagram Protocol) is a transport layer protocol used for establishing low-latency and loss-tolerating connections between applications on the internet. It is commonly used for real-time applications where low latency is critical, such as online gaming, video conferencing, and live streaming. Unlike TCP, it does not guarantee reliable transmission of data but provides a best-effort delivery mechanism ideal for real-time applications.
WebRTC is designed to work well with UDP and provides mechanisms to handle the packet loss and latency that can come with real-time communication. It also includes support for STUN and TURN servers, which can help with NAT traversal and other connectivity issues. Overall, WebRTC offers a powerful set of tools for building real-time communication applications that work seamlessly across web browsers and mobile devices.
1 . Signaling
Signaling is the process of establishing a communication channel between two peers in a WebRTC session. It is responsible for exchanging session descriptions, such as media codecs, network addresses, and security keys, between the peers before establishing the connection.
Signaling can be accomplished using a variety of methods, including WebSocket, HTTP, SIP, and XMPP, depending on the needs of the application.
The server can be implemented using any technology that can handle real-time communication, such as Node.js.
What is the Session Description Protocol (SDP)?
The Session Description Protocol (SDP) is a format used to describe the media streams that will be exchanged between peers in a WebRTC session. It is a key/value protocol with a new line after each value. It will feel similar to an INI file. A Session Description contains zero or more Media Descriptions. Mentally you can model it as a Session Description that contains an array of Media Descriptions.
Interpreting SDP:- Every line in a Session Description will start with a single character, ie key. It will then be followed by an equal sign. Everything after that equal sign is the value followed by a new line.
The Session Description Protocol defines all the keys that are valid. You can only use letters for keys as defined in the protocol. These keys all have significant meanings, which will be explained later.
Take this Session Description excerpt.
a=my-sdp-value
a=second-value
You have two lines. Each with the key a. The first line has the value my-sdp-value, and the second line has the value second-value.
How WebRTC uses SDP
The internal implementation of SDP is abstracted by the RTCPeerConnection object, now the question that arises is how WebRTC uses the Session Description Protocol.
What are Offers and Answers?
In WebRTC, the offer/answer model is used to negotiate the session parameters between the peers. The session description is exchanged using SDP (Session Description Protocol) and is used to describe the media streams that will be exchanged between the peers.
This exchange is handled using Interactive Connectivity Establishment (ICE, a protocol that lets two devices use an intermediary to exchange offers and answers even if the two devices are separated by Network Address Translation (NAT).
Each peer, then, keeps two descriptions on hand: the local description, describing itself, and the remote description, describing the other end of the call.
2 . Connecting
What are the challenges?
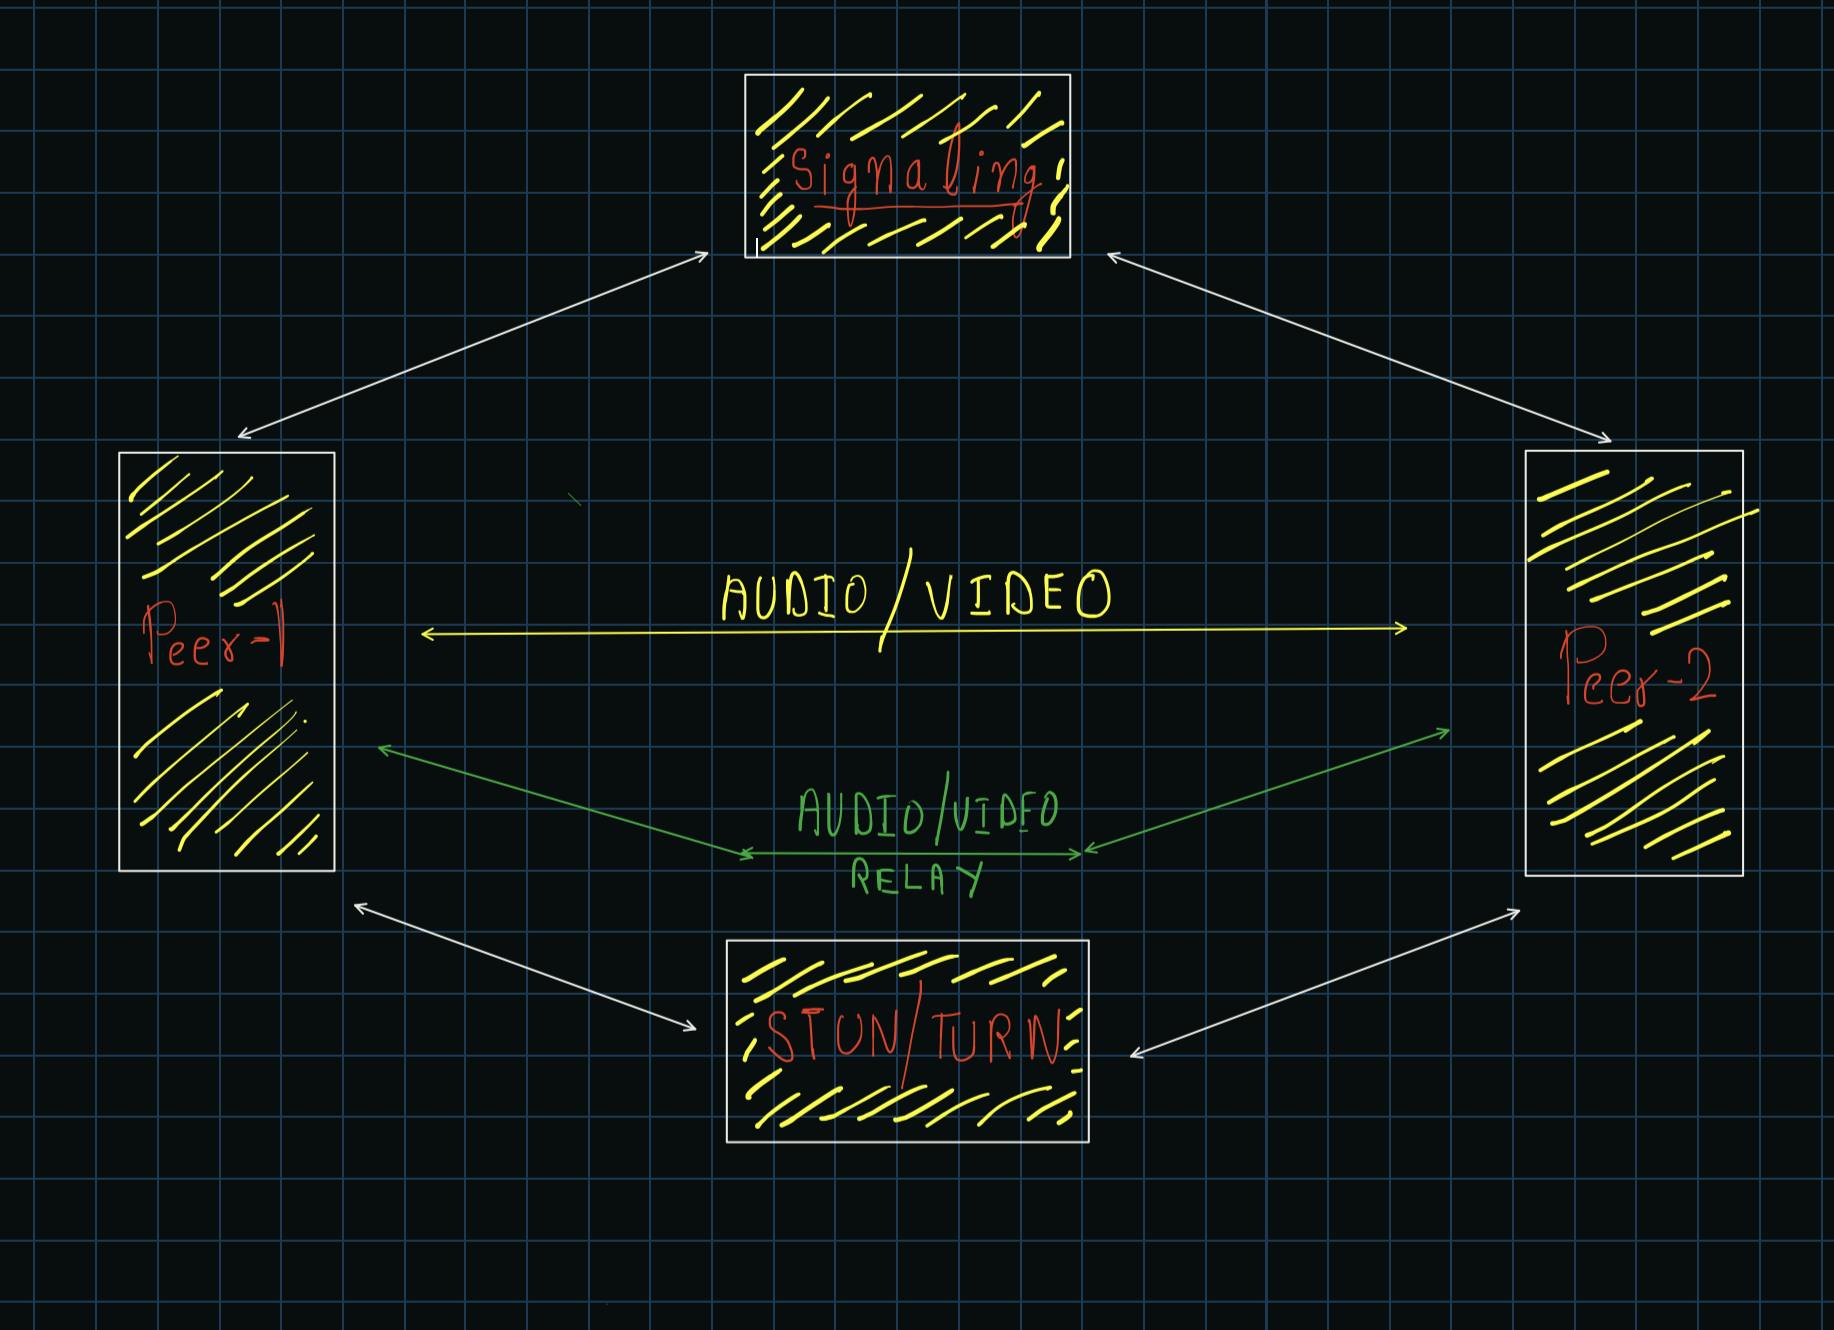
To overcome the challenges associated with p2p communication WebRTC uses the ICE framework which finds the best way for communication as it may need to bypass the firewall, allocate unique addresses, and relay data if the router doesn’t permit it.
ICE Agent publishes the ways it is reachable known as candidates. ICE then takes up the responsibility to find the communication pairs that work.
The are a lot of Network behaviors that ICE overcomes and are worth exploring.
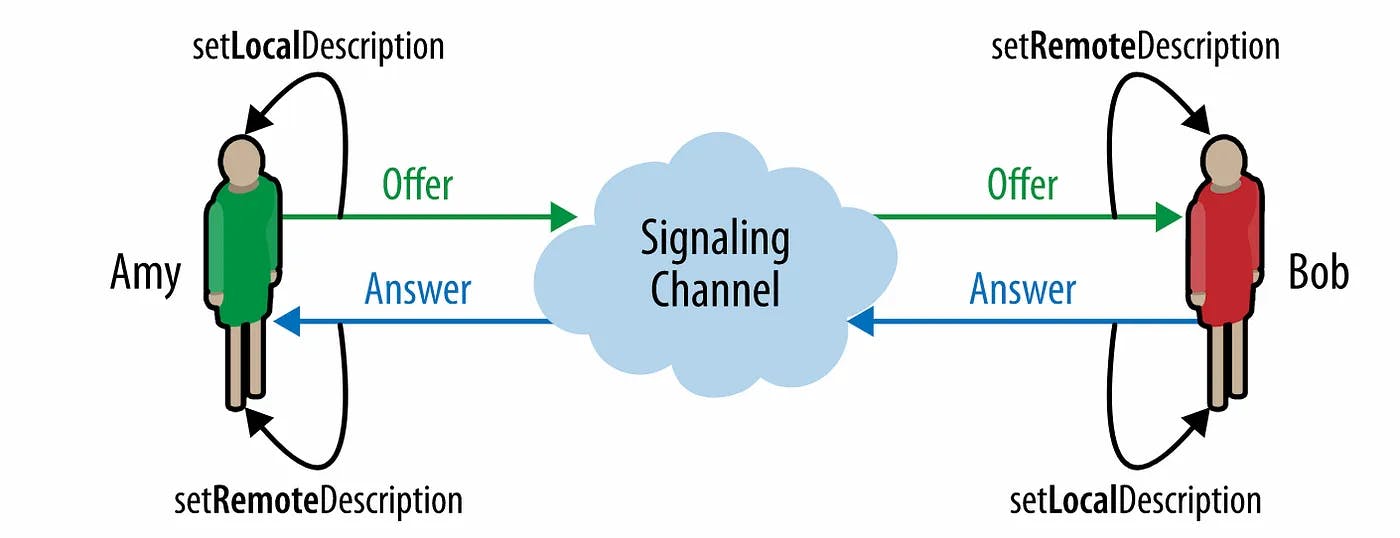
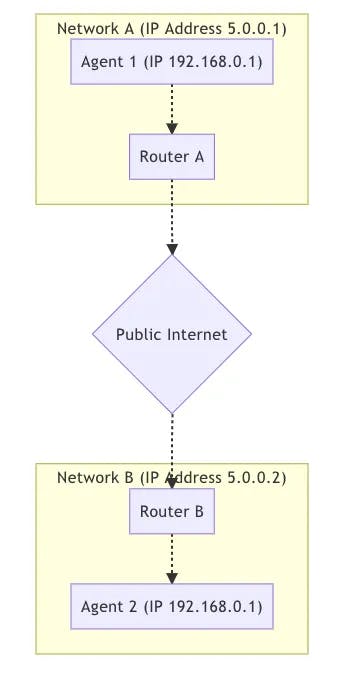
Peers in different networks For the majority of peer-to-peer communication peers will be located in different networks in the image below there are two distinct networks over the public internet with two hosts
For the hosts in the same network, it is very easy to connect. Communication between 192.168.0.1 -> 192.168.0.2 them is easy. These two hosts can connect to each other without any outside help.
However, a host using Router B has no way to directly access anything behind Router A. A host using Router B could send traffic directly to Router A, but the request would end there. How does Router A know which host it should deliver the message to?
Protocol Restrictions Some networks don’t allow UDP traffic at all, or maybe they don’t allow TCP. Some networks have very low MTU. There are lots of variables that network administrators can change that can make communication difficult.
Firewall/IDS Rules Another is ‘Deep Packet Inspection’ and other intelligent filterings. Some network administrators will run software that tries to process every packet. Many times this software doesn’t understand WebRTC, so it blocks it because it doesn’t know what to do
NAT Mapping
Network Address Translation (NAT) is a standard that supports address sharing by handling routing of data inbound and outbound to and from devices on a LAN, all of which are sharing a single WAN (global) IP address.
The problem for users is that each individual computer on the Internet no longer necessarily has a unique IP address, and, in fact, each device’s IP address may change not only if they move from one network to another, but if their network’s address is changed by NAT and/or DHCP. For developers trying to do peer-to-peer networking, this introduces a conundrum: without a unique identifier for every user's device, it’s not possible to instantly and automatically know how to connect to a specific device on the Internet. Even though you know who you want to talk to, you don’t necessarily know how to reach them or even what their address is.
Again we have Agent 1 and Agent 2 and they are in different networks. However, traffic is flowing completely through. Visualized it looks like.
To make this communication happen you establish a NAT Mapping. Creating a NAT mapping will feel like an automated/config-less version of doing port forwarding in your router.
The downside to NAT Mapping is that network behavior is inconsistent between networks. ISPs and hardware manufacturers may do it in different ways. In some cases, network administrators may even disable it. The full range of behaviors is understood and observable, so an ICE Agent is able to confirm it created a NAT Mapping and the attributes of the mapping.
The document that describes these behaviors is RFC 4787
Creating a Mapping
Creating a mapping is the easiest part. When you send a packet to an address outside your network, a mapping is created! A NAT mapping is just a temporary public IP and port that is allocated by your NAT. The outbound message will be rewritten to have its source address given by the newly mapped address. If a message is sent to the mapping, it will be automatically routed back to the host inside the NAT that created it. The details around mappings are where it gets complicated.
Mapping Creation Behaviors
Mapping creation falls into three different categories:
Endpoint-Independent Mapping
One mapping is created for each sender inside the NAT. If you send two packets to two different remote addresses, the NAT mapping will be re-used. Both remote hosts would see the same source IP and port. If the remote hosts respond, it would be sent back to the same local listener.
This is the best-case scenario. For a call to work, at least one side MUST be of this type.
Address Dependent Mapping
A new mapping is created every time you send a packet to a new address. If you send two packets to different hosts, two mappings will be created. If you send two packets to the same remote host but different destination ports, a new mapping will NOT be created.
Address and Port Dependent Mapping
A new mapping is created if the remote IP or port is different. If you send two packets to the same remote host, but different destination ports, a new mapping will be created.
Mapping Filtering Behaviors
Mapping filtering is the rule around who is allowed to use the mapping. They fall into three similar classifications:
Endpoint-Independent Filtering
Anyone can use the mapping. You can share the mapping with multiple other peers, and they could all send traffic to it.
Address Dependent Filtering
Only the host the mapping was created for can use the mapping. If you send a packet to host A you can only get a response from that same host. If host B attempts to send a packet to that mapping, it will be ignored.
Address and Port Dependent Filtering
Only the host and port for which the mapping was created for can use that mapping. If you send a packet to A:5000 you can only get a response from that same host and port. If A:5001 attempts to send a packet to that mapping, it will be ignored.
Mapping Refresh
It is recommended that if a mapping is unused for 5 minutes it should be destroyed. This is entirely up to the ISP or hardware manufacturer.
STUN
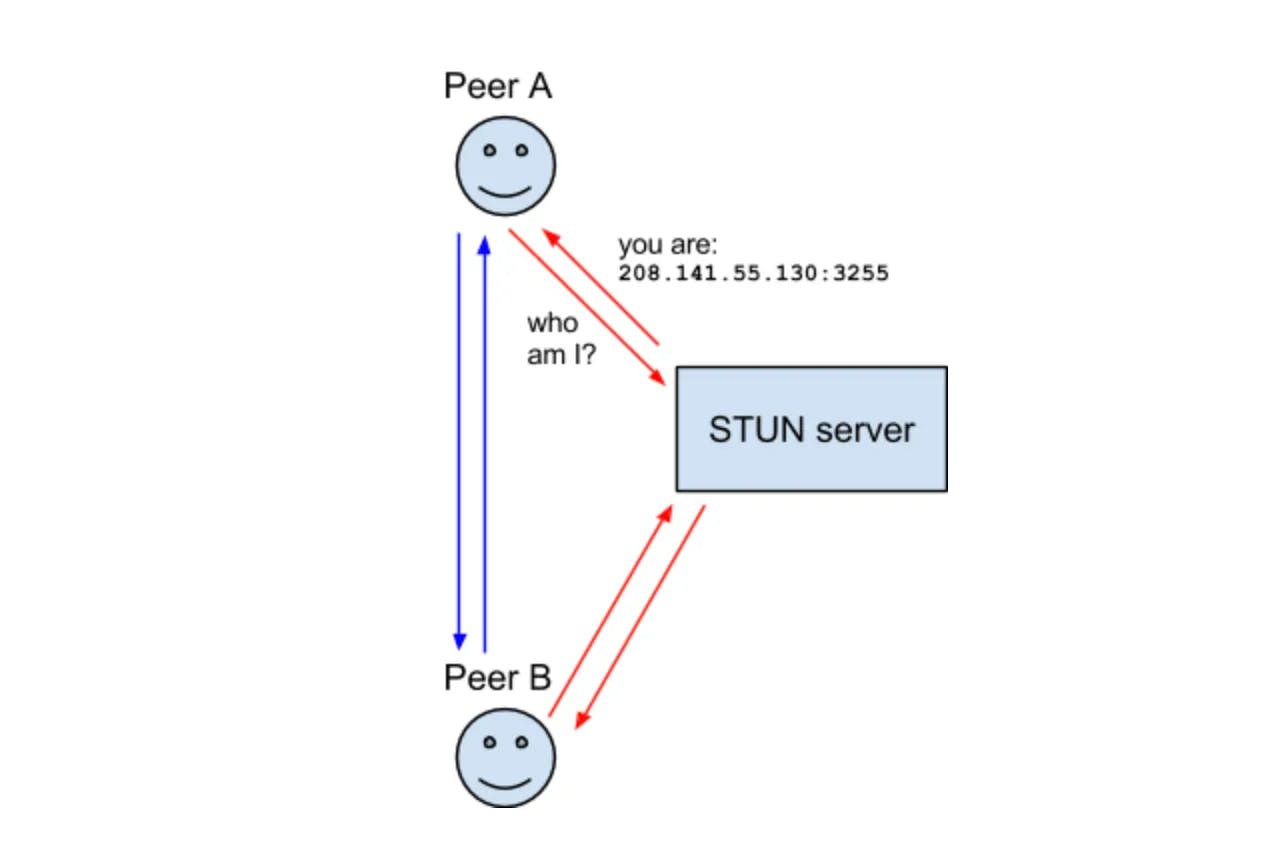
STUN(Session Traversal Utilities for NAT) is a protocol that was created just for working with NATs. This is another technology that pre-dates WebRTC (and ICE!). It is defined by RFC 5389 which also defines the STUN packet structure. The STUN protocol is also used by ICE/TURN.
STUN is useful because it allows the programmatic creation of NAT Mappings. Before STUN, we were able to create NAT Mappings, but we had no idea what the IP/Port of it was! STUN not only gives you the ability to create a mapping, but you also get the details so you can share it with others so they can send traffic to you via the mapping you created.
TURN
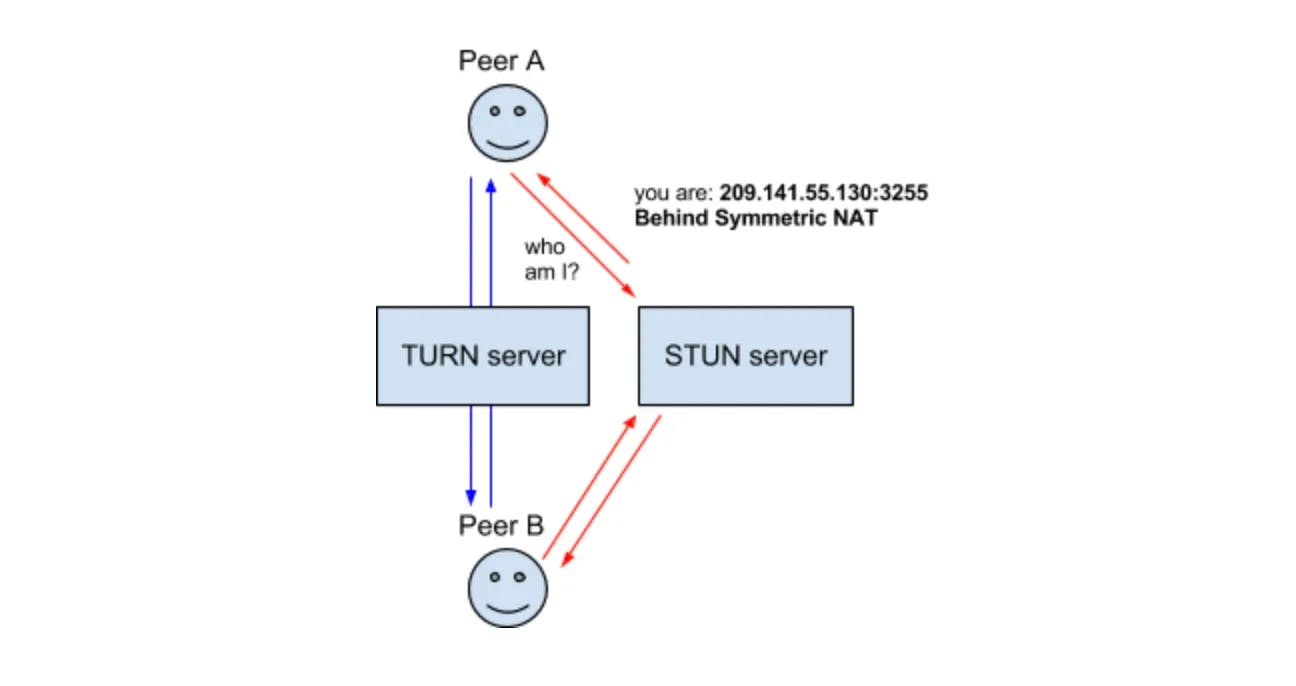
TURN (Traversal Using Relays around NAT) is defined in RFC5766 as the solution when direct connectivity isn’t possible. It could be because you have two NAT Types that are incompatible, or maybe can’t speak the same protocol! TURN is also important for privacy purposes. By running all your communication through TURN you obscure the client’s actual address.
TURN uses a dedicated server. This server acts as a proxy for a client. The client connects to a TURN Server and creates an Allocation. By creating an Allocation a client gets a temporary IP/Port/Protocol that can send into to get traffic back to the client. This new listener is known as the Relayed Transport Address. Think of it as a forwarding address, you give this out so others can send you traffic via TURN! For each peer you give the Relay Transport Address to, you must create Permission to allow communication with you.
When you send outbound traffic via TURN it is sent via the Relayed Transport Address. When a remote peer gets traffic they see it coming from the TURN Server.
ICE
ICE (Interactive Connectivity Establishment) is how WebRTC connects two Agents. Defined in RFC8445, this is another technology that pre-dates WebRTC! ICE is a protocol for establishing connectivity. It determines all the possible routes between the two peers and then ensures you stay connected.
These routes are known as Candidate Pairs, which is a pairing of a local and remote address. This is where STUN and TURN come into play with ICE. These addresses can be your local IP Address, NAT Mapping, or Relayed Transport Address. Each side gathers all the addresses they want to use, exchanges them, and then attempts to connect!
Two ICE Agents communicate using the STUN Protocol. They send STUN packets to each other to establish connectivity. After connectivity is established they can send whatever they want. It will feel like using a normal socket.
3 . Securing
What security does WebRTC have?
Every WebRTC connection is authenticated and encrypted. You can be confident that a 3rd party can’t see what you are sending or insert bogus messages. You can also be sure that the WebRTC Agent that generated the Session Description is the one you are communicating with.
It is very important that no one tampers with those messages. It is ok if a 3rd party reads the Session Description in transit. However, WebRTC has no protection against it being modified. An attacker could perform a man-in-the-middle attack on you by changing the ICE Candidates and updating the Certificate Fingerprint.
How does it work?
WebRTC uses two pre-existing protocols, Datagram Transport Layer Security (DTLS) and the Secure Real-time Transport Protocol (SRTP).
DTLS allows you to negotiate a session and then exchange data securely between two peers. It is a sibling of TLS, the same technology that powers HTTPS, but DTLS uses UDP instead of TCP as the transport layer. That means the protocol has to handle unreliable delivery. SRTP is specifically designed for exchanging media securely. There are some optimizations we can make by using it instead of DTLS.
DTLS is used first. It does a handshake over the connection provided by ICE. DTLS is a client/server protocol, so one side needs to start the handshake. The Client/Server roles are chosen during signaling. During the DTLS handshake, both sides offer a certificate. After the handshake is complete, this certificate is compared to the certificate hash in the Session Description. This is to ensure that the handshake happened with the WebRTC Agent you expected. The DTLS connection is then available to be used for data channel communication.
To create an SRTP session we initialize it using the keys generated by DTLS. SRTP does not have a handshake mechanism, so has to be bootstrapped with external keys. Once this is done, media can be exchanged that is encrypted using SRTP!
4 . Communication
After meeting all the requirements, an RTC connection can be established and thus data can be communicated between the peers.
What are the mistakes that I made!!
Be sure to review these to see if there’s anything you’re doing wrong:
Mis-configuring NAT traversal
Testing locally
Not using adapter.js
Forgetting to take care of security
Diving into the code before grasping WebRTC
Not configuring TURN servers (use xirsys.com for free TURN/STUN servers)
Project with WebRTC implementation - Baat Cheet
References
WebRTCforTheCurious (Highly Recommended)
WebRTC Crash Course - Hussein Nasser (Highly Recommended Video)
RFC 3350 — RTP: A Transport Protocol for Real-Time Applications
RFC 5405 — Unicast UDP Usage Guidelines for Application Designers